Sunday, October 18, 2015

Fall Baking and Crafts!

This weekend was a fun time spent with a wonderful friend doing some baking, crafts, and catching up to celebrate the fall season! We made some amazing food to snack on and each did a fun craft while we drank our apple cider and visited!
We made our own hot apple cider, mini apple pies, pumpkin fluff, candy corn rice krispies, and cut up some fresh orange watermelon from my garden! For crafts, we made a fall wreath and a couple country votive candle holders.

Hot apple cider recipe:
64 FL oz (one jug) Honey Crisp Apple Juice
5 sticks of cinnamon
1 tsp clove
1 tsp allspice
-Simmer for about 20 minutes to enhance flavor then enjoy!
Our candy corn were super simple.

Candy Corn Rice Krispies:
--We dyed normal rice krispies an orange color with red and yellow food coloring. Then we dipped one end in chocolate almond bark and the other in white chocolate.

Apple pie bites:
1 tube of original Cresent rolls
1 granny smith apple cut into 8 pieces
2 Tbsp brown sugar
1/2 tsp cinnamon
1/4 tsp clove
1/4 tsp allspice
2 Tbsp butter
Chopped walnuts (optional)
--- Preheat oven to 375 degrees. Combine brown sugar, clove, allspice, and cinnamon. Roll out each Cresent roll and spread with melted butter. Sprinkle with sugar combination and a few chopped walnuts. Place the apple on top of that and roll up the Cresent roll. Top with more melted butter and sugar mixture. After doing all eight bites, bake for 12 minutes. Take out of the oven and allow to cool for about 5-10 minutes before serving. (Optional- drizzle with a little caramel sauce before eating)

Pumpkin Fluff:
1 tub whipped cream
1 1/2 cups pumpkin (I used some I had frozen in my freezer from our home grown pumpkins but canned will work too)
1 tsp pumpkin spice
1 pkg vanilla pudding mix
1 cup dark chocolate chips
---Combine all ingredients in a bowl and serve with graham crackers and/or sliced apples!

-For our wreath craft, we bought a stick wreath at walmart and glued a sunflower and some pinecone to a corner to add a little color.
-Then we also took small votive candle holders and hot glued short pieces of broken twigs to the sides to create some fall table decor.

Friday, October 16, 2015

Wine Bottle Tiki Torches

      Wine bottles have many decorative uses after they are empty; however, I wanted to give them a functional use. I wanted something fun to sit on the table when eating meals outside on the patio, plus I wanted to keep bugs away. So, I decided to turn the two wine bottles I had into table top tiki torches. It was super easy and didn't take any more than 5 minutes to put together once I found all of the supplies I needed.
    I ended up ordering the tiki wicks and the fuel from Amazon for a pretty reasonable price, the hex piece(s) came from Bomgaars, and the pebbles came from Walmart.


------Here's What you Need:------

Wine bottles
Tiki Wicks
3/4 inch hex brushing
pebbles (optional) or other "filler"
Tiki fuel


------Here's What to Do:------

1) Remove the labels from your wine bottles
       (or you can leave them on- I left one on and took the other one off)
2) Fill your wine bottles with the pebbles or filler you pick out.
3) Put the tiki wick through the hex piece
4) Fill the bottles with fuel not quite all the way to the top
5) Rest the brushing and wick onto the top lip of the wine bottle
6) It is ready to light and be used!
----Yes, it is that easy!----

Tuesday, September 15, 2015

Pallet Couch

My most recent DIY was making a pallet couch to create a flexible, functional, and fashionable furniture piece for my living room. I say flexible because it can be used as seating, as well as be used as an extra bed for guests if they need a place to stay since the cushion is essentially a twin mattress with a cover. I say functional because it can seat numerous people in addition to other furniture in the living room. I use the term fashionable because it is unique and personalized to fit the style of my living room.
Supplies:
(4) Pallets -see below for advice in picking out pallets
(1-2) gallons of primer depending on pallet size
(1) gallon of satin or semi-gloss depending on preference
(1) twin mattress
(1) twin fitted sheet
decorative pillows to fit your liking

Article in an Organic Gardening Magazine I have.
the June/July 2014 version on page 66.
          This project really was an easy and fun project; however, it was very time consuming when it came to painting the pallets. The first step in the process was to find the pallets I wanted to use. There are a couple things to keep in mind when searching for pallets. The first is that not all pallets are the same. It is important to find pallets that will fit well and work well together if they are not exactly identical. Some pallets are longer than others, some are deeper than others, and so on. I was lucky enough to find four (4) pallets that were exactly the same and in great shape! The second thing to keep in mind is where the pallets came from and how/if they were treated. (See picture titled Pallet Precautions.) The third is the condition and sturdiness of the pallets. You want to make sure you have pallets that are not breaking down, starting to mold, or are broken. You want strong wood that is put together well and will withstand the weight of people over time as they sit on the couch.
          After choosing my pallets, I had to choose the primer and paint. I chose to use a heavy duty primer to be sure it sealed the wood and got into all the cracks and crevices. I hand brushed on the coat of primer to be sure I got it thick and into all the spaces I need to fill. This process took a long time to get in between and under each piece of wood. It took a while to dry because of putting it on fairly heavy, but it sealed the wood very well. After the primer had dried completely, I used a paint sprayer to put on the top coat of paint. This coat of paint went a lot faster than the primer using the sprayer; however, I still recommend doing the primer coat by hand so you can be sure it gets put on well. I then let the pallets dry again so they were ready to assemble and bring in the house.
          I stacked the pallets 2 high and 2 wide on top of an area rug to prevent scratching my wood floor. Then, I put a regular sized twin mattress on top of the pallets which worked perfectly without overlapping the edges of the pallets. I used a foam mattress topper on top of the mattress, as well to make the couch more comfortable. At Walmart, I found a red fitted sheet to put over the mattress. While on a mini vacation, I went to an Ikea store and found the perfect pillows to match my living room. I picked 3 big fluffy pillows and 26x26 inch covers to fill up the back and serve as a back rest along the wall I put the couch on. The covers are a heavy duty polyester and cotton material which is durable and washable. I went with this type of material since I know they will be used often; therefore, needing washed often. I assembled the pallet couch in my living room and tada! I now have a fun piece of up-cycled furniture that cost me far less than buying a new couch would! This would be a great idea for a dorm room, too! Students could have a couch and bed all in one!

Thursday, September 10, 2015

Up-cycle Project ~ Dresser

Up-cycling has become a huge trend in design in recent years. I have found myself caught in the excitement of taking something old and giving it a new look. I have had a dresser for quite some time now that has been sitting in my shop unused and missing a drawer. Finally, I decided I wanted to make some use of it and up-cycle it to give it a new look to go in my bedroom. I love using the eight Rs: refuse, reduce, reuse, recycle, repair, restore, re-purpose, and redesign. Not only did this project cost me next to nothing because I was reusing resources I already had, but I go a brand new designer looking dresser out of it. I ended up only spending about $10 on the entire project. (More on that to follow.) As a future teacher of Family and Consumer Sciences, I want to teach my students how to be resourceful in so many ways; therefore, I wanted to do this project to showcase one way to be resourceful.
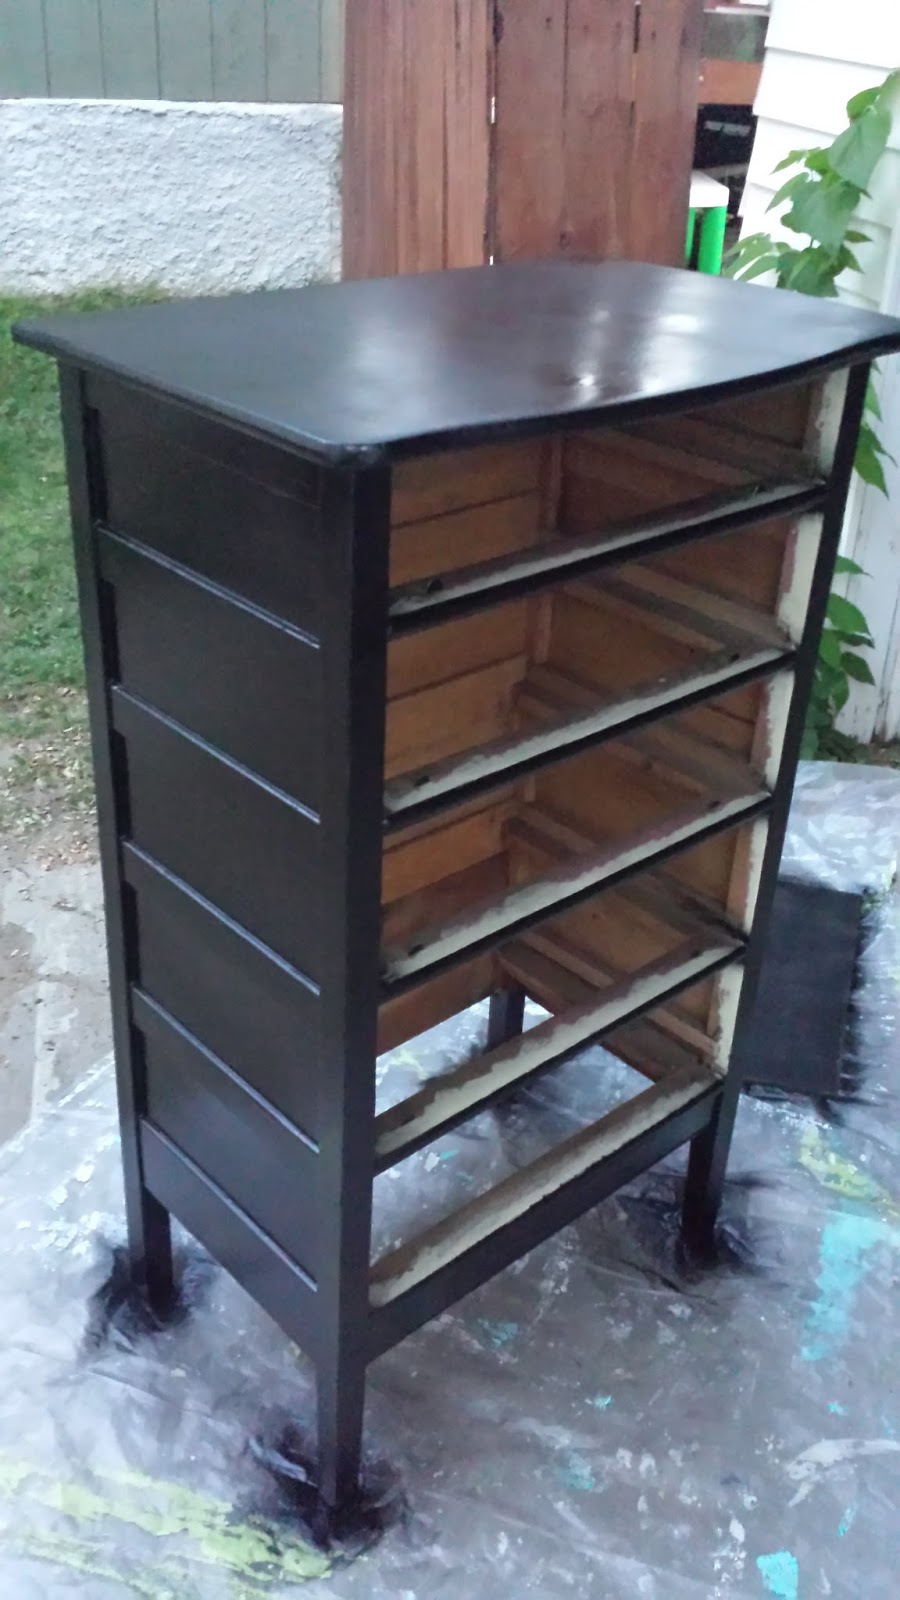
 Here is my dresser before the transformation. I started out by cleaning off the dresser and wiping out each drawer as it was full of dust and cob webs from sitting in the shop for so long. I then took each knob off the drawers to prepare them to be painted. I sanded down the entire dresser, as well as each knob to get off excess paint and rough up the surface so the paint would stick better.

  Where the drawer was missing at the bottom, I decided to make a shelf. I measured and cut an old piece of paneling to put along the bottom of the dresser. Then I spray painted both the dresser and the knobs with black spray paint. I bought the spray paint at Walmart for about $3.

  For the drawers, I bought some fabric at Walmart for $2 per yard. It only took about a yard to do all four drawers. I used spray adhesive I bought at a yard sale for $0.25 to put each piece of cut fabric onto the drawers. Then, around the edges I used the hot glue I had to glue the along the edges down nicely to make sure the fabric wouldn't come off.


The finished project!
When the hot glue had cooled and the paint was dry. I assembled the dresser by putting the handles back onto the drawers. I lined each drawer with some shelf lining that I also bought at a yard sale for $0.50 just to better protect the bottom of the drawers.

I absolutely love the finished project. It was a total transformation! Now the dresser that was sitting in my shop totally useless is a trendy piece of furniture in my bedroom! Best of all, I only spent about $6 and some of my time to completely up-cycle it!


Saturday, December 28, 2013

Graduation Cake and Cupcakes!

   Flashing back a few months... May 2013, I graduated! I was not one of those people who wanted to order a couple big graduation cakes for my reception, and I surely didn't want anything that was ordinary or simple. I wanted to have cupcakes and a cake, and I wanted to make them all myself.
   That week I was busy that is for sure! I spent a full day in the kitchen mixing up all the cupcakes myself and baking them. 280 cupcakes, 6 hours, and one big mess later, I was finally finished with the baking. Once they were all baked I had them all tightly wrapped and stored in airtight containers until the next day when I spent the evening frosting them. I decided to have four flavors of cupcakes: Salted Caramel, Pink Lemonade, Vanilla with butter cream frosting, and Confetti with butter cream frosting.
   The next day I spent half the afternoon painting the cupcake stand that my dad helped me to make for my cupcakes. I absolutely love it and it will be used over and over for many occasions I am sure! After I finished my cupcake stand, I spent all evening mixing up each kind of frosting and frosting all of the cupcakes to which I then repacked them into their airtight containers. Thank goodness for the help of my best friend who came to Chadron early before graduation to help me frost all of the cupcakes and make signs for each flavor to follow go with the theme of my graduation party (peacock). My graduation preparation would have taken twice as long as if it wasn't for her help.
   That evening I also threw together a graduation hat cake for the top of my cupcake tower. I spent about an hour frosting and star-tipping the entire top part of the cap. It turned out super cute and I got so many compliments on it! It was definitely the finishing touch to my cupcake tower!
   The cupcakes were a huge hit at my graduation reception! People typically go from reception to reception and of course that means the usual cake after cake after cake. When people got to my party they loved that I didn't just have typical flavors of cake. My guests loved trying the salted caramel and pink lemonade cupcakes because they were something different from every other party. I love to cook, so making my own cupcakes and cake was not a problem at all for me, and I loved getting to hear the responses when people found out I did all of the work on my own rather than hiring out someone to do it for me!
My Family! They are my biggest supporters! Love them!
   The day of graduation was of course a bittersweet one, but definitely a day I will never forget. The weather was perfect (especially since I was planning my reception outside of my house in a huge party tent), and I had the most amazing friends and family to support me. Graduations are all about celebrating a great accomplishment and huge milestone while gathering with family and friends for good food and a good time, and I was so blessed to have such a wonderful day!

Thursday, December 26, 2013

Camouflage Cupcakes

    Its been a while since I have blogged about my cooking... Guess it's time to catch up :)
   One of my new adventures lately was camouflage cupcakes. My aunt is a huge duck dynasty fan and asked if I would make camouflage cupcakes for her birthday. The middle of the cupcakes looked camo and I even swirled the frosting to make it camouflage colors. So I made a huge mess of the kitchen but it was so much fun! I love trying something new! The cupcakes turned out great and my aunt and everyone at the party absolutely loved them!
   Making these cupcakes was actually very simple (I cheated and used the box due to the amount of time I had, but cake mixes from scratch would work too but just be sure both cake recipes bake about the same amount of time if you do some from scratch.) If you are interested in making some, here are the instructions:

Ingredients:
Chocolate Cake Mix (I used German chocolate)
Vanilla Cake Mix
Chocolate Frosting (recipe below)
Vanilla Frosting (recipe below)

      Chocolate Frosting:
3 cups powdered sugar
6 tbsp unsweetened cocoa powder
6 tbsp butter (I find Room Temperature works best for frosting)
5 tbsp evaporated milk
1 1/2 tsp vanilla extract

Sift together powdered sugar and cocoa then set aside in separate bowl. Cream butter until smooth. Gradually add in the sifted mixture and evaporated milk alternating what goes into the creamed butter. Add in the vanilla and beat until light and fluffy.

      Vanilla Frosting:
3 cups powdered sugar
1/2 cup butter (Room Temperature)
1/2 tsp vanilla extract
2 tbsp milk

Cream butter. Gradually add in powdered sugar. Stir in the vanilla and milk. Beat all of the ingredients until smooth.

Instructions:
    Mix up both cake mixes according to box. Take about 1/3 to 1/2 of the vanilla mix out and dye it green with green food coloring. (You should now have three bowls of cake mix: white, brown, and green.) Take and put small blobs of cake mix alternating colors into white cupcake liners. Fill the liners about 2/3 full.
    Average the baking time of the cake mixes according to the boxes. (Even though the average bake time is according to the boxes, still watch the cupcakes. They will be done when a toothpick is inserted into the middle of a couple of the cupcakes and the toothpick comes out clean.) When cupcakes are done, take them out of the oven, and out of the pan immediately (This prevents cupcakes from sitting in pan and "sweating" making them kind of soggy.) Allow to cool completely

   For the frosting mix up the chocolate frosting recipe as well as a plain frosting recipe. Do the same thing with the plain frosting as you did with the vanilla cake and dye about 1/3 to 1/2 green depending on the amount of green you want. (You should now have three colors for frosting: white, brown, and green.) In a piping bag (with a large frosting tip not the normal tip set size) alternate dropping tablespoons of each color frosting into the bag. *Be careful to not squish all the frosting together into one messy color. (Simply squeeze the bag from the top not the sides to prevent meshing colors.) Swirl frosting on top of each cupcake and the colors should turn out swirled together as well. Store in airtight containers if not serving right away! Enjoy!

Recipe Makes about 40-48 Cupcakes

Wednesday, December 25, 2013

Reflecting on the Past Year

Our Last Family Photo
Grandpa and his Granddaughters
  I know this doesn't have anything to do with the title of my blog, but I decided I would like to share it anyway. Reflecting on this past year for me has truly been a lesson in God's timing and his little blessings. (Bare with the story here as the moral does come at the end.) It all started a year ago this morning sitting around the Christmas tree when I thought to myself "I should record grandpa reading the Christmas story like he does every year. There will be a Christmas when we won't have him there to read it." Little did it know a year later he wouldn't be here with us sitting around the tree. I'm so thankful I took the opportunity when I did last year to record him reading the Christmas story so we could listen to it this morning.
    Then one Saturday morning in November we randomly decided to throw together a family picture while we were all together had our host brother who was available to take a picture for us. None of us were dressed up and we were just sitting on grandmas front porch, but it turned out to be one of the best family pictures we have ever taken. Everyone looks so happy! Later that afternoon grandpa was admitted into the hospital for a week and that was the last family picture we ever got. What a blessing!
    Later that Saturday evening I got the unexpected call with the news grandpa went to the hospital. It was during a movie night with two of my friends, and I don't think God could have put two better people in the room with me. As I burst into tears on the phone my roommate (not even knowing what was going on) came over and just hugged me. The two of my friends offered to take me up to the hospital to see grandpa and bare with me while I sat out in the hallway of the hospital and cried before even walking into the room. Those two were so great that night. I am so thankful God picked those two as my friends!
    Then after grandpa was in the hospital for a week, he was released for two days. This was just long enough to see the beginning of the addition to their house that he drew out to add on for Tia to move in. He sure was excited to see it started. God wanted him to see the addition at least get started before he passed away. How cool!
    After being home a couple days, he fell at the house and the ambulance was called to take him back to the hospital.
    That last week was the hardest but I had one of the best people there to support me who knew exactly was I was going through. Sammie was such a blessing to me and was there to let me cry and to visit grandpa with me. She and grandpa had some great conversations together and I know he enjoyed every minute of it! God used Sammie to reach out to me in a huge way that week!
    I got a call from mom the morning of November 20th saying things weren't looking good. I felt God pulling on my heart with the need to write grandpa a letter and tell him how thankful I was for him. I brought Sammie up to the hospital to read the letter for me as I knew I couldn't do anything but hold his hand and cry. Needless to say that letter is tear stained and in a very special spot now. Grandpa was practically unresponsive, but I knew he could hear me. He did mumble to me "I love you" and I then knew this would probably be it. We spent some time up there and left.
    Later that evening I got the call that grandpa went to heaven and oddly enough, I felt the biggest weight lifted off my shoulders and I felt comfort in knowing I did tell him everything I did and I got to see him that morning. God knew I didn't need to be in the room when he passed.
    The day of grandpas private burial was also Grandma and Grandpa's 48th anniversary. There was not a cloud in the sky. It was an absolutely beautiful day!
    The day of the funeral service was perfect weather for everyone to get here safely which was great. Having already had the private family burial of grandpa, his service of course I did cry, but it felt more like I was attending church than a funeral. It was amazing! I thank God we did it the way we did burying him privately and later having the "celebration of life."

    If you have stuck with me through this whole long story that's awesome (I have always been one slow to the point of things haha) so here is the lesson in it: Gods timing is absolutely perfect. As Ecclesiastes 3:11 says, "He has made everything beautiful in His time." This has been a huge lesson to me looking back on the past year with the little blessings that God gives us and the absolute perfect timing he provides us with. We often go out and make our own plans and think the way that we do things is going to work out perfect, but God surprises us with something different and even better in His time.
    I am so blessed this Christmas to have received the most precious gift of all. A baby born in a manger whose hands years later was pierced for our transgressions and died for our sins. Without that gift of eternity, I wouldn't be able to see my grandpa again! The best gift I have received did not come wrapped in paper and sitting under a tree, but from a stable Bethlehem where a baby was born in a manger many many years ago. Happy birthday Jesus and Merry CHRISTmas to everyone!